Saturday, 23 April 2016

MAPI over HTTP

What is mapi over http


Messaging Application Programming Interface (MAPI) over HTTP is a new transport protocol implemented in Microsoft Exchange Server 2013 Service Pack 1 (SP1). MAPI over HTTP improves the reliability and stability of the Outlook and Exchange connections by moving the transport layer to the industry-standard HTTP model. This allows a higher level of visibility of transport errors and enhanced recoverability. Additional functionality includes support for an explicit pause-and-resume function. This enables supported clients to change networks or resume from hibernation while maintaining the same server context.

Implementing MAPI over HTTP does not mean that it is the only protocol that can be used for Outlook to access Exchange. Outlook clients that are not MAPI over HTTP capable can still use Outlook Anywhere (RPC over HTTP) to access Exchange through a MAPI-enabled Client Access server.

Benefits of MAPI over HTTP

  • Enables future innovation in authentication by using an HTTP based protocol.
  • Provides faster reconnection times after a communications break because only TCP connections—not RPC connections—need to be rebuilt. Examples of a communication break include:
    • Device hibernation
    • Changing from a wired network to a wireless or cellular network
  • Offers a session context that is not dependent on the connection. The server maintains the session context for a configurable period of time—even if the user changes networks.

Prerequisites
  1. Upgrade Outlook clients to Outlook 2013 SP1 or Outlook 2010 SP2 and updates KB2956191 and KB2965295 (April 14, 2015).
  2. Upgrade Client Access and Mailbox servers to Exchange 2013 SP1
Note : All Client Access servers must be upgraded to Exchange 2013 SP1 before enabling MAPI over HTTP. Otherwise, Outlook can fail to connect to mailboxes.
Failure to upgrade the all the Mailbox servers in a Database Availability Group (DAG) can result in email delays and a client requirement to restart Outlook in case of a database failover.
3.       On all Exchange 2013 servers, you need to install Microsoft .NET Framework 4.5.2
4.     On all Exchange 2013 SP1 Client Access servers, add the COMPLUS_DisableRetStructPinning Windows environment variable by performing the following steps.
a.     In a Command prompt window, run systempropertiesadvanced and click Environment Variables.
b.     In the System variables section, click New and enter the following information.
o    Variable name   COMPLUS_DisableRetStructPinning
o    Variable value   1
c.     When you are finished, click OK.

How to configure MAPI over HTTP
1.       Virtual directory configuration   Bydefault, Exchange 2013 SP1 creates a virtual directory for MAPI over HTTP. You use the Set-MapiVirtualDirectory cmdlet to configure the virtual directory. You must configure an internal URL, an external URL, or both

Set-MapiVirtualDirectory -Identity "Contoso\mapi (Default Web Site)" -InternalUrlhttps://Contoso.com/mapi -IISAuthenticationMethodsNegotiate
2.     Certificate configuration   The digital certificate used by your Exchange environment must include the same InternalURL and ExternalURL values that are defined on the MAPI virtual directory. Make sure the Exchange certificate is trusted on the Outlook client workstation and that there are no certificate errors, especially when you access the URLs configured on the MAPI virtual directory.
  1. Update server rules   Verify that your load balancers, reverse proxies, and firewalls are configured to allow access to the MAPI over HTTP virtual directory.
  2. Enable MAPI over HTTP in your Exchange Organization

        Set-OrganizationConfig -MapiHttpEnabled $true

Test MAPI over HTTP connections
You can test the end-to-end MAPI over HTTP connection by using the Test-OutlookConnectivity cmdlet.
Test-OutlookConnectivity -RunFromServerId ContosoMail -ProbeIdentity OutlookMapiHttpSelfTestProbe

Logs for MAPI over HTTP activity are at the following locations:

  • %ExchangeInstallPath%Logging\MAPI Address Book Service\
  • %ExchangeInstallPath%Logging\MAPI Client Access\
  • %ExchangeInstallPath%Logging\HttpProxy\Mapi\

Note: This will applicable to Exchange server 2016.


Exchange server 2016 mail flow and transport pipeline

Exchange server 2016 mail flow and transport pipeline

Transport pipeline

Transport pipeline is a collection of services, connections, components, and queues that work together to route all messages to the categorizer in the Transport service on an Exchange 2016 Mailbox server inside the organization.

Front End Transport service on Mailbox servers   This service acts as a stateless proxy for all inbound and (optionally) outbound external SMTP traffic for the Exchange 2016 organization. The Front End Transport service doesn't inspect message content, doesn't communicate with the Mailbox Transport service, and doesn't queue any messages locally.

Transport service on Mailbox servers   This service is virtually identical to the Hub Transport server role in Exchange Server 2010. The Transport service handles all SMTP mail flow for the organization, performs message categorization, and performs message content inspection. Unlike Exchange 2010, the Transport service never communicates directly with mailbox databases. That task is now handled by the Mailbox Transport service. The Transport service routes messages among the Mailbox Transport service, the Transport service, the Front End Transport service, and (depending on your configuration) the Transport service on Edge Transport servers.

Mailbox Transport service on Mailbox servers   This service consists of two separate services:


·         Mailbox Transport Submission service   This service connects to the local mailbox database using an Exchange remote procedure call (RPC) to retrieve messages. The service submits the messages over SMTP to the Transport service on the local Mailbox server or on other Mailbox servers. The Mailbox Transport Submission service has access to the same routing topology information as the Transport service.

·         Mailbox Transport Delivery service   This service receives SMTP messages from the Transport service on the local Mailbox server or on other Mailbox servers and connects to the local mailbox database using RPC to deliver the messages.


The Mailbox Transport service doesn't communicate with the Front End Transport service, the Mailbox Transport service, or mailbox databases on other Mailbox servers. It also doesn't queue any messages locally.

Transport service on Edge Transport servers   This service is very similar to the Transport service on Mailbox servers. If you have an Edge Transport server installed in the perimeter network, all mail coming from the Internet or going to the Internet flows through the Transport service Edge Transport server. This service is described in more detail later in this topic.

Mail flow from external senders

1.     A message from outside the organization enters the transport pipeline through the default Receive connector named "Default Frontend <Mailbox server name>" in the Front End Transport service.

2.     The message is sent to the Transport service on the local Mailbox server or on a different Mailbox server. The Transport service listens for messages on the default Receive connector named "Default <Mailbox server name>".

3.     The message is sent from the Transport service to the Mailbox Transport Delivery service on the local Mailbox server or on a different Mailbox server.

4.     The Mailbox Transport Delivery service uses RPC to deliver the message to the local mailbox database.


Mail flow from internal senders

SMTP messages from inside the organization enter the transport pipeline through the Transport service on a Mailbox server in one of the following ways:


·         Through a Receive connector.

·         From the Pickup directory or the Replay directory.

·         From the Mailbox Transport Submission service.

·         Through agent submission.


Outbound mail flow


1.     The Mailbox Transport Submission service uses RPC to retrieve the outbound message from the local mailbox database.

2.     The Mailbox Transport Submission service uses SMTP to send the message to the Transport service on the local Mailbox server or on a different Mailbox server.

3.     In the Transport service, the default Receive connector named "Default <Mailbox server name>" accepts the message.

4.     What happens next depends on the configuration of the Send connector:


o    Default   The Transport service uses the Send connector you created to send the message to the Internet.

o    Outbound proxy   The Transport service uses the Send connector you created to send the message to the Front End Transport service on the local Mailbox server or on a remote Mailbox server. In the Front End Transport service, the default Receive connector named "Outbound Proxy Frontend <Mailbox server name>" accepts the message. The Front End Transport services sends the message to the Internet.


Internal mail flow


1.     The Mailbox Transport Submission service uses RPC to retrieve the outbound message from the local mailbox database.

2.     The Mailbox Transport Submission service uses SMTP to send the message to the Transport service on the local Mailbox server.

3.     Transport service determines the mail destination and route it to the transport service on the mailbox server where the recipient mailbox is residing.

4.     Mailbox transport delivery service receives the message and connect to user’s mailbox database to deliver.


Office 365 Directory Synchronization


Office 365 Directory Synchronization

What is Dir Sync:

If you are already using Active Directory in your on premise environment, you probably have invested a lot of time creating user accounts, populating their attributes and adding them to the appropriate groups. Directory Synchronization takes all that information, users, groups, contacts, email addressesess, phone numbers, names, etc and synchronizes it from your Active Directory to Office 365. The synchronization is ongoing which allows you to continue to manage users, groups and contacts from your local Active Directory. The synchronization is 1 way (from Active Directory to Office 365) and at this time, once enabled, cannot be disabled.

Installation and Configuration

The installation of Directory Sync is very straight forward. It’s pretty much a next, next, next install, with you only having to choose the install path. The install process installs several components behind the scenes:

·         Microsoft Online Directory Synchronization, which is really just Identity Lifecycle Manager 2007
·         Microsoft SQL Server 2008 R2
·         Microsoft Online Services Sign-In Assistant

When the installation is complete, you’ll need to launch the configuration wizard to configure the synchronization. Again not a lot of options, you must specify your Office 365 Credentials, your Active Directory Credentials and choose whether or not you’ll be using Rich Coexistence. The Rich Coexistence option is only available if you have Exchange 2010. Enabling Rich Coexistence also allows the Microsoft Online Directory Sync tool write Access to your local Active Directory.

During the installation, an account named MSOL_AD_Sync is created in the Users OU in the Active Directory. This is the account that Dir Sync uses to interact with the Active Directory. The Enterprise Admin Credentials specified during the configuration are not used on an ongoing basis. If you selected the Rich Coexistence Option, there is a group created, MS_AD_Sync_RichCoexistence.

The MSOL_AD_Sync User account has the following permissions granted:

·         Replicate Directory Changes
·         Replication Synchronization
·         Replicating Directory Changes All

MS_AD_Sync_RichCoexistence has the following permissions granted:

·         Write msExchangeSafeRecipientsHash on User objects
·         Write msExchangeBlockedSendersHash on Users objects
·         Write msExchUCVoiceMailSettings on Users objects
·         Write msExchArchiveStatus on Users objects
·         Write msExchSafeSendersHash on Users objects
·         Write ProxyAddresses on User,Contact, and Group objects

How we can view and modify the Dir Sync configuration

The key thing to realize is that Directory Synchronization is really just Microsoft Identity Lifecycle Manager 2007. You can launch the configuration interface by running:

C:\Program Files\Microsoft Online Directory Sync\SYNCBUS\UIShell\miisclient.exe

Operations Console

Upon launching the MIIS Client you will see the Operations Area. The Microsoft Online Directory Synchronization uses 2 Management agents. The SourceAD management agent reads the information from the source Active Directory. The TargetWebService management agent writes the information to the Microsoft Online Directory. The operations area will allow you see a log of what the Management Agents have done. In this example we’ll take a look at the initial synchronization which is located at the bottom of the history and has a Profile Name of Full Import Full Sync. Once selected, in the lower left pane of the window you’ll see Synchronization Statistics which allow you to see what objects have been synchronized as well as which objects have been filtered out and therefore won’t be synchronized to the Metaverse and Microsoft Online.


Source AD Management Agent

Adds

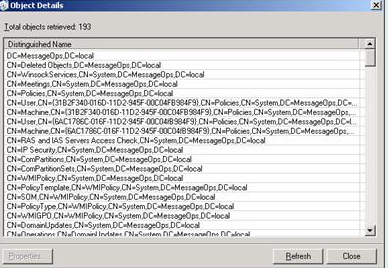
In the image above there are 193 Adds. This appears to be all the objects read from the Active Directory. Not all of these objects will be replicated to Microsoft Online as filters (explained later) will prevent them from synchronizing. Clicking on the Adds will allow you to see what objects have been read as shown below.


Projections

The Projections show which objects have been written to the Metaverse. In the example above you’ll see that of the 193 objects read, only 14 are written to the Metaverse. Just because an object is written to the Metaverse does not mean it will be written to Microsoft Online, as the TargetWebService also has filter rules when synchronizing from the Metaverse to Microsoft Online. Again you can click on Projections to see what objects have been written to the Metaverse.

Filtered Disconnectors

Filtered Disconnectors show the objects what are not synchronized due to the objects matching a defined filter rule.

TargetWebService

The TargetWebService is the Agent that reads information from the Metaverse and writes information to Microsoft Online. You’ll notice in the Agent Operations log that the TargetWebService performs 2 operations on each run, an import and an export.


Clicking on the Profile name Export and then clicking Adds, appears to show what has actually been synchronized to Microsoft Online. In this case 7 objects were synchronized to Microsoft Online. This screenshot is from the same session as earlier, in which 14 objects were written to the Metaverse, but as you see above, only 7 were synchronized to Microsoft Online. The reason is that the objects did not have a display Name specified. When you click Adds, you’ll notice that the objects GUIDs are listed instead of names, but you can click on the GUID to display the objects properties

Metaverse Search

The Metaverse Search area will allow you see the objects, and their attributes, that have been synchronized to the Metaverse. To see the objects, simply click the Search button.


The Search Results will show all objects in the Metaverse. In the image above you’ll notice that 14 objects are in the Metaverese and displayName is only column displayed. You can click on the Column settings link to display additional attributes. You can also limit the search by changing the Scope by Object Type drop down list or clicking the Add Clause action to filter by attribute.
The Metaverse search area could be useful if you are trying to determine why certain objects aren’t synchronizing to Microsoft Online.

Joiner

The Joiner will allow you to see the objects which have not been synchronized. Selecting the Management Agent SourceAD and Disconnector Type Disconnectors, and then clicking search will display all the disconnectors.

Controlling the Frequency of Directory Synchronization

By default the Directory Synchronization runs every 3 hours. If you want to increase or decrease the frequency you will need to modify the following file:

C:\program files\Microsoft Online Directory Sync\Microsoft.Online.DirSync.Scheduler.exe.Config

Just open with notepad and you’ll see a line that looks like:
<add key=”SyncTimeInterval” value=”3:0:0″ />

By default the SyncTimeInterval is set to 3 hours. If you wanted it to run every 30 minutes you’d change the value to “0:30:0”. We wouldn’t recommend going any lower than 15-30 minutes.

Port


We need to open 443 towards internet for Dir Sync to work.

Thursday, 7 April 2016

What is outlook auto complete or nick name file (.NK2)


What is outlook auto complete or nick name file (.NK2)

Every time that you type an email address or name in the message window of MS-Outlook, it automatically offer you a list of users and email address that you can choose. This feature is known as 'AutoComplete' and Outlook automatically build this emails list according to user activity and save it into a file with .NK2 extension.

The location of the NK2 file of Outlook

The location of the NK2 AutoCompelete file created by Outlook might be different from one computer to another, depending on the operating system and the version of Outlook. 

Here's the rules for finding the location of your NK2 file:

For Outlook 2003/2007 with Windows 2000, Windows XP, or Windows Server 2003: 

The location of the nk2 file is C:\Documents and Settings\[User Profile]\Application Data\Microsoft\Outlook 
The name of the NK2 file is identical to the Outlook profile name, with .nk2 extension.

For Outlook 2003/2007 with Windows Vista, Windows 7, or Windows server 2008: 

The location of the nk2 file is C:\Users\[User Profile]\AppData\Roaming\Microsoft\Outlook 
The name of the NK2 file is identical to the Outlook profile name, with .nk2 extension.

For Outlook 2010/2013 with Windows Vista, Windows 7, or Windows server 2008: 

The nk2 file is located in C:\Users\[User Profile]\AppData\Local\Microsoft\Outlook\RoamCache 
The name of the NK2 file is in the following format: Stream_Autocomplete_X_AAAAAAAAAAAAAAAAAAAAAAAAAAAAAAAA.dat The X is the file index (usually 0) and AAAAAAAAAAAAAAAAAAAAAAAAAAAAAAAA is a random 16-byte key in hexadecimal format.

For Outlook 2010/2013 with Windows XP: 

The nk2 file is located in C:\Documents and Settings\[User Profile]\Local Settings\Application Data\Microsoft\Outlook\RoamCache 
The name of the NK2 file is in the following format: Stream_Autocomplete_X_AAAAAAAAAAAAAAAAAAAAAAAAAAAAAAAA.dat The X is the file index (usually 0) and AAAAAAAAAAAAAAAAAAAAAAAAAAAAAAAA is a random 16-byte key in hexadecimal format.

A common question from users

One of my email contacts has a new email address as their company changed their domain name. I have deleted and re-entered her correct email address about half a dozen times in the address book and yet my PC still thinks I am sending her emails to her old domain.com instead of her new domain.com. When I entered her name it defaults to the "olddomain.com" address even though it is nowhere to be found on my PC. I have to select her "newdomain.com" address from the address book for it to work. Has anyone experienced where Outlook is keeping this old email address info? How can I can purge it?

This is an all too common experience for many users.

Use the arrow key to select the incorrect address and press the Delete key.

You can clear the entire autocomplete file (*.NK2): in older versions you need to delete the NK2 file from your hard drive.

Outlook 2010 And Newer

Outlook 2010 and 2013 does not use the NK2 file; it stores the autocomplete cache in the mailbox or data file and caches the addresses in an autocomplete stream at C:\Users\username\AppData\Local\Microsoft\Outlook\RoamCache. You can type or paste %localappdata%\Microsoft\Outlook\RoamCache in the address bar of Windows Explorer then press Enter to open the folder location where the cache is stored.

Outlook 2010 also creates a contact for people you send mail to, as insurance if the autocomplete cache becomes corrupt. Look for these contacts in the Suggested Contacts folder. This unpopular feature was removed from Outlook 2013.

Clear the autocomplete cache using the File, Options, Mail, Empty Auto-complete list button.


You can also use the /cleanautocompletecache switch to clear the cache.

Nickname Cache Is Empty :

If the users are losing addresses of people they recently replied to (but not older addresses), it's because Outlook crashes or does not close properly and the changes are not written to the NK2 file. The existing *.NK2 shouldn't be replaced by a clean *.NK2 if this happens, but new addresses you've sent new mail to or replied to won't be saved to the file. Less used addresses are replaced by new addresses when the NK2 contains 1000 addresses in Outlook 2003 or 2000 address if using Outlook 2007.

If all addresses disappear, it means something is corrupt and Outlook is replacing the NK2 with a new, clean one.

Import Addresses From NK2:

When you upgrade from Outlook 2007 and earlier in-place and use the same profile, Outlook 2010 or 2013 should import the NK2 you used with your previous Outlook version automatically on the first run. If Outlook didn't import the NK2 automatically, or you are using a new computer and didn't think to move the NK2 file, or you made a new profile, you can import the NK2 after the first run by using the ImportNK2 switch.


To import .nk2 files into Outlook 2010 or Outlook 2013, follow these steps:

1. Make sure that the .nk2 file is in the following folder:
   %appdata%\Microsoft\Outlook
   The .nk2 file must have the same name as your current Outlook profile. (By default, the profile name is "Outlook.")
2. Press Windows Key + R to open the Run dialog.
3. In the Open box, type (or paste) outlook.exe /importnk2, and click OK to import the NK2 into your profile.

The .nk2 file is renamed with a .old file name extension on the first start of Outlook 2010. If you need to re-import the .nk2 file, remove the .old file name extension.

Tuesday, 15 March 2016

Released: March 2016 Quarterly Exchange Updates


Microsoft released the quarterly updates for Exchange Server are now available on the Microsoft Download Center. Exchange Server 2016 receives its first Cumulative Update, and Exchange Server 2013 Cumulative Update 12 is also released. Exchange Server 2007 and Exchange Server 2010 Update Rollups provide an updated OWA S/MIME control signed with a SHA-2 certificate. More information and highlights of all these releases can be found below. 

Updated OWA S/MIME control

All of the packages released today include an update to the OWA S/MIME control. The control itself has not changed, but has now been signed with a SHA-2 compliant certificate. All of the updates released will install the updated control onto the Exchange Server. Users who have installed the control into their browser will need to re-install this onto devices where the previous version was installed. Installing the control is straight forward and can be done quickly using OWA Options, Exchange Control Panel or Exchange Admin Center depending upon the release of Exchange you are using. 

New distribution package for Exchange Server 2016 updates

With the introduction of Cumulative Updates for Exchange Server 2016, we are making a change to the update package type for this product version. Previous versions of Exchange used self-extracting packages to deliver service packs and cumulative updates. We have heard requests to release these updates as .ISO’s. With the capability to mount .ISO’s directly in Windows Server 2012 and later, we think it makes sense to ship Cumulative Updates as .ISO’s. At this time, we are not planning to do this for Exchange Server 2013 Cumulative Updates but could be persuaded to do so if enough people ask for it. One down side to this approach is that the package is much larger. However, copying a single .ISO vs. the ever growing number of files and folders over the network is much more efficient and faster. We hope you like this change. 

Change to Mailbox Anchoring for Remote PowerShell

We heard your feedback on the changes to load balancing Remote PowerShell introduced into Exchange Server 2013 and 2016. As announced by Ross here, we have reverted this behavior in the Cumulative Updates being released today. 

Additional languages for Outlook on the Web

Exchange Server 2016 Cumulative Update 1 adds support for 17 additional languages in Outlook on the Web. These languages will appear automatically in the language selection drop down after a server is updated to Cumulative Update 1. 

.Net 4.6.1 Support

We know that many of you have been asking about .Net 4.6.1 and Exchange. Rest assured we are working closely with the .Net Framework team to resolve issues preventing us from supporting .Net 4.6.1 with Exchange Server. While we are not there yet, we hope to be very soon. Support for .Net 4.6.1 is planned for future Cumulative Updates for Exchange Server 2013 and 2016. 

Slow installations on Windows Server 2012 R2

For customers who are running Exchange on Windows Server 2012 R2, we want to make certain you are aware of a condition which can substantially increase the amount of time it takes to install Exchange Updates on this OS. Working with the .Net team, we have discovered that systems which have applied Windows Update KB3097966 can take 50% more time to install Exchange. The .Net team is working on a resolution to this and will include a fix in a future product update. In the meantime, customers who have deployed this Windows update can take a one-time action on their server before installing Exchange or a Cumulative Update to bring installation time back to normal. This procedure needs to be done once on every Exchange server running Windows Server 2012 R2. The command to execute is: 
“%windir%\Microsoft.NET\Framework64\v4.0.30319\ngen.exe update”
Errors and warnings encountered running this command can be safely ignored provided the final exit status code of 0 is reported in the output. 

Support for Standalone Hybrid Configuration Wizard in Exchange Server 2010

Customers using Exchange Server 2010 in Hybrid mode with Office 365 will notice a new link in the EMC to use the Updated Standalone Hybrid Configuration Wizard. We encourage all customers to use this updated version of the Hybrid Configuration Wizard. 

Release Details

KB articles which contain greater depth on what each release includes are available as follows: 

Permanently Clear Previous Mailbox Info for EXO Exchange GUID sync issues

Microsoft is introducing a new parameter that can be called by using the Set-User cmdlet in Exchange Online PowerShell. The new para...